Enhanced Tool Bar (ETB) for FrameMaker 9, 10 and 11
See also: Deutsche version; English version for FM-7.2/8, FM-9…11, FM-12, FM-13, FM-14/15
Caveat
According to the licensing terms of Adobe, the modification of dlls may invalidate your licence.
Hence all installation programs which exchange a dll by a modified one request your confirmation.
What is it all about?
- The Enhanced Tool Bar (ETB) provides coloured buttons in normal state for better recognition. Reasonable menu items and tool bars are added.
- An enhanced version of the vertical tool bar is back. It fits nicely on facing pages thus reducing mouse miles.
- The Equation Palette has been enlarged for better legibility on high resolution screens..
- The ETB is active only in WYSIWYG View (FM-11), both in unstructured and structured mode.
- "Standard" in this text refers to the original FrameMaker installation.
- In the following vv stands for the affected FrameMaker version
- Special ETB functions (such as special documentation) are found in menu Help > Enhanced Tool Bar
- You may wish to read the documentation (1.5 MB)
- In this description vv stands for the respective FM version: 9, 10 or 11
What's about FM updates?
Tool Bars
Vertival Tool Bar
Workspaces
Special enhancements to FM:
Context menu "Insert special symbols"
Coloured cursors and tab indicators
Modified dialogues
Utility TextHelper
Documents
Download and installation
Uninstallation
![[To top/bottom of page]](../z_designs/nav-dnup.gif) What's about FM updates?
What's about FM updates?
Install ETB only to a fully updated FM version (9.0.4.255, 10.0.3.419, 11.0.2.384).
- When updating or re-installing FM, keep the preferences.
- Uninstall ETB before you update FM (use button Remove ETB of the installation program) – FM updating processes may not work with installed ETB.
- Update FM.
- Install ETB again.
Tool Bars
The standard Tool Bars of FM-vv are grey in normal state and coloured only when hovered over. Hence it is difficult to recognise buttons on a large screen instantly.

ETB exchanges the icons in the standard Tool Bars so that
the normal appearance is coloured and the buttons are grey in hovered state: align_object,
object_properties, para_format, quick_access, structured, table_format, text_format and trackchanges.
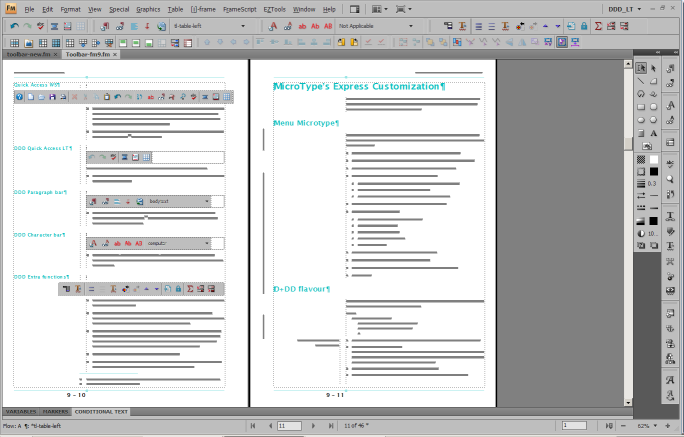
The additional tool bars in ETB group buttons for paragraphs, characters and tables somewhat different than in the standard arrangement. This is to cope with additional functions:
|
|
ETB quick access lt |
|
ETB paragraph bar |
|
ETB character bar |
Character catalogue, copy ƒ format, repeat last ƒ command, character format drop down list, convert text to lower case, mixed case, upper case; insert special characters |
| ETB tables bar |
|
ETB display |
|
ETB extra |
|
Tool tips for all Tool Bars show keyboard shortcuts where applicable.
Vertical Tool Bar
With ETB the vertical Tool Bar is back. For better handling the switching has been changed from 4 to 2 levels. The upper part of the tool bar now show more useful buttons than those of the traditional vertical tool bar. Since no tool tips are available on this standard FM palette, you may need to look at the documentation or the image below:
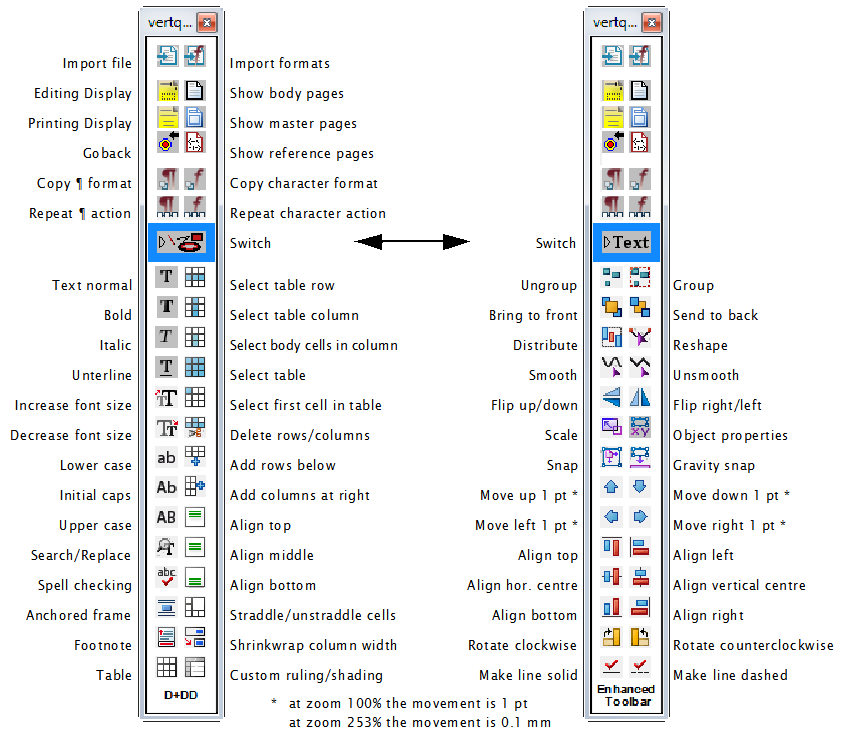
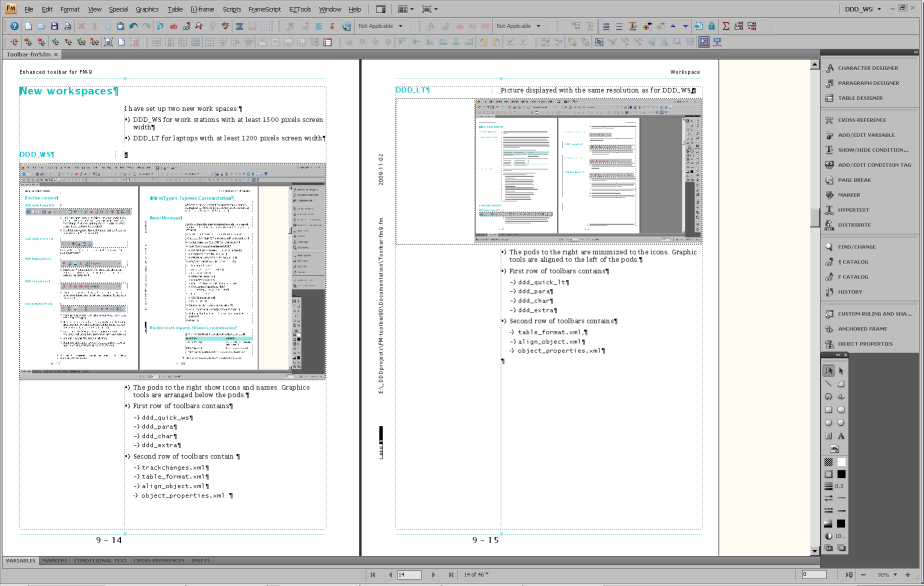
Workspaces
Two additional work spaces are defined: DDD_LT for laptops
with at least 1200 pixels width, and DDD_WS for workstations
with larger screens.
You know that work spaces can be configured by the user - do so alos with the ETB work spaces (add/remove tool bars, add/remove pods, iconise pods...)
ETB-LT
ETB-WS
Context
menu "Insert special symbols"
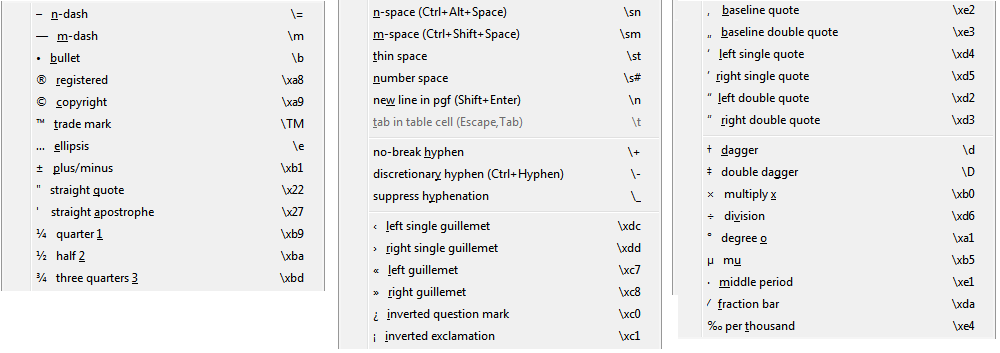
The standard button for inserting special symbols has been exchanged on the tool bar, because the new button and text context menu offers a much larger set of symbols (here folded to save space):
Coloured cursors and tab indicators
Optionally coloured (magenta) cursors and TAB indicators can be installed to make them better visible.

Enhanced dialogues
Since years many dialogues have not been adapted to the requirements. ETB currently provides only a modification for the most annoying one. On this webpage you can see what could be done (if many of you request it).
This feature is installed optionally.
| Origianl | Enhanced |
|---|---|
 |
 |
Utilility TextHelper
After copying or cutting text to the clipboards this utility may help to get rid of unwanted features. Except for the two last functions it works for all Windows applications.
| Icon | Hotkey | Function |
|---|---|---|
This is in |
Windows+v |
Paste the clipboard contents without formatting information, that is, just plain text (including line breaks). This functions is handy to copy from other applications, including web pages, but also within FrameMaker. |
| Windows+space | Remove sequences of spaces to one before pasting the text (without formatting information). | |
| Windows+u | Change \ to / before pasting the text (without formatting information). Very useful to convert Windows paths to URL notation. | |
| Windows+y | Scroll both doc windows 1 page DOWN | |
| Windows+x | Scroll both doc windows 1 page Up |
The latter two commands work only correct, if there are only two documents windows open (probably arranged side by side). No book window must exist either.
Documents
ETB provide PDF documents, which are not available in FM (FM help may be online only). For curious people even some still valid documents are provided.
| Title in menu | Description (partly form the document) |
|---|---|
| Offline Help | PDF with the same content as the online-Help system (for offline work) |
| FrameMaker vv commands | This is a complete list of the commands available in FrameMaker vv. It has been generated with a script from itl. It lists the commands with their name, menu label, short cut and hexadecimal function code. |
| Templates, Samples & Clipart | Read-only FM file with hyperlinks to the various sample files and
clip art files |
| Character Sets (FM-9) | This document describes support for the Unicode character sets in
FrameMaker 8… |
| MIF Reference (FM-9) | MIF (Maker Interchange Format) is a group of ASCII statements that create an easily parsed, readable text file of all the text, graphics, formatting, and layout constructs that FrameMaker understands. Because MIF is an alternative representation of a FrameMaker document, it allows FrameMaker and other applications to exchange information while preserving graphics, document content, and format. |
| MML Reference (FM-7) | FrameMaker includes support for a markup language called MML (Maker Markup Language). You can use any standard text editor to create an MML file. Later, you can open the MML file as a FrameMaker document or import it into a FrameMaker template. In a department where different people are responsible for writing and formatting documents, writers can use MML statements to mark up manuals in progress; at the same time, graphic designers can create the formatting specifications in FrameMaker templates. |
| This manual describes how to customize FrameMaker by changing settings in initialization files and creating custom menu configurations and tool bars. Based on the FM-7 manual from Adobe and various other sources. Although written for FM-11, most information is applicable to FM-vv. |
Download and installation
- You may wish to read the documentation (1.5 MB) before you decide about the installation.
- Close FrameMaker. if necessary.
- If you have ETB already installed and want to update with a newer version:
- Run the installation program from the shortcut in the Start Menu
- Use Remove ETB to de-install it from FrameMaker
- Delete all items in the directory
C:\SystemMods\FMvv-toolbars-en
- Download the appropriate ETB installation file
FM version 9 Date Version Installation file Latest changes 9.0.4.255 2017-04-28 ETB 9 v7.0 Inst-FM9-toolbars-en.zipUser must confirm installation of modified dll (coloured cursors). 10 Date Version Installation file Latest changes 10.0.2.419
10.0.3.419ETB 10 v7.0 Inst-FM10-toolbars-en.zip11 Date Version Installation file Latest changes 11.0.2.384 ETB 11 v7.0 Inst-FM11-toolbars-en.zip - Expand the downloaded ZIP to any location (e.g. the Desktop). This expands the
file
PrepInstall-etb-en.exeand the directoryInstallETBand then starts the Prepare Installation.
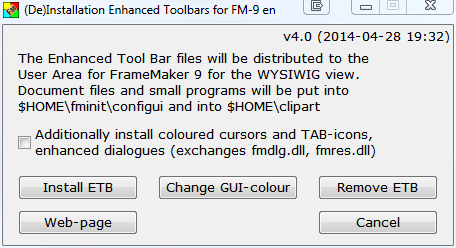
The pPicture show the installation programs for ETB-9

To release some Windows burden from the user, a first step collects necessary information.
And to avoid too much trouble with the User Access Control the installation files are put into the User Area/D+DD.
Then Continue Iinstallation.
File structure set up in
%appdata%\D+DD\FMvv-toolbars-en\ETB
Icons
Tool Bars
WorkSpaces
FM-puzzle.ico
Install-FMvv-etb.exe
- If you only want to colour the standard tool bar icons, use button Change GUI-colour
- For ETB functionality,
- Check the box if you want to also install coloured cursors and tab icons and the enhanced dialogs.
- Use button Install ETB to install the ETB functionality. - After a short time a message box indicates successfull installation (see first note below).
Notes
- There are cases – especially in companies where only an admin may install programs – where files can not be copied to the user area. In this case only manual installation according to the method mentioned in the documentation will help: see heading Possible installation problems..
- All software from D+DD is Donationware - if you find it helpful for your work, think about supporting my work.
What is installed on your computer ?
- A shortcut
(De)Installation FMvv-tool bars enis placed in the Start Menu folderAll Users\Programs. You may move the shortcut to any sub folder. - The following files are copied to the required locations:
- FM 9/10: Tool Bars to
%APPDATA%\Adobe\FrameMaker\vv\toolbars - FM 9/10: Workspaces to
%APPDATA%\Adobe\FrameMaker\vv\WorkSpaces(bothStructuredandUnStructured) - FM11: Workspaces and tool bars to
%APPDATA%\Adobe\FrameMaker\vv\WorkSpaces (both Structured and UnStructured, Wysiwyg view) - Additional icons to
%APPDATA%\Adobe\FrameMaker\vv - The customisation file, documents, vertical tool bar, and utility
TextHelperto$HOME\fminit\configui - The enlarged Equations editor to
$HOME - The modified
fmdlg.dllandfmres.dllto$HOME\fminit(optionally) - The additional clip art to
$HOME\clipart
- FM 9/10: Tool Bars to
%APPDATA% is the symbolic name for the User area. The real path name depends on the OS.
$HOME is the installation directory of FrameMaker.
Uninstallation
If you want to get rid of the enhancement and go back to the original FM installation:
- Start the installation with the shortcut in the Start Menu and click Remove ETB .
- All files of this installation will be removed (tool bars, work spaces, icons, config files, clip art, added. documentation).
- FrameMaker vv will copy the original tool bars into the user area at its next start.
- Since this is not a Windows un-installation, you must delete the installation directory and the short cut manually to get rid of all items. On the other hand this allows to install the Enhanced Tool Bar again later.